years ago i visited a country restaurant in smithville, ohio called "The Barn". they served the best broccoli cheese soup EVER. later, in our local newspaper recipe section someone shared a recipe for broccoli cheese soup that sounded as if it might be similar to what i had loved at The Barn. i tried it, it was and after that became a family favorite in my house.
here's that recipe for those who, unlike me, :( can still handle a good share of cheesiness. it is delicious!
Broccoli Cheese Soup
(makes 4 qts which is a lot unless you have a family to feed. you might want to cut the recipe down.)
2 T. butter
1/3 c. onion chopped fine
sauté' these together for 3 minutes.
add 3 c. chicken stock or 3 c. water with 3 chicken bouillon cubes
cook until dissolved.
bring to boil and add:
4 oz. fine egg noodles
1 - 10 oz package frozen chopped broccoli (or equivalent of fresh)
1/4 t. garlic powder
cook all this until noodles and broccoli are tender (about 5 minutes)
stir in 3/4 lb. velveeta cheese, cubed and 3 c. milk.
cook and stir until smooth. do not boil.
you will love it, i promise!

Showing posts with label recipe. Show all posts
Showing posts with label recipe. Show all posts
Friday, September 25, 2015


Thursday, December 11, 2008
sweet things
It used to be that every year beginning in October I would begin baking and candy making for the holidays. By the time the festive days arrived I would have a freezer full of sweet delights to fill baskets for family, friends and neighbors. Over the years life got so busy that I no longer was devoted to this yearly tradition. This year I decided to rekindle that creative spark. Not to the point of starting in October, but I have done more baking and candy making this year than for many a year. I guess it's taken me this long to settle into the fact that I now have the time, therefor the inclination to do this.
Aside from the double batch of mints I shared with you the other day, yesterday morning I was busy working on these....

 and a few peppermint turtles for the little ones.


 And today I made chewy oatmeal cookies. Actually I used spelt flakes in place of the oatmeal and cranberries in place of raisins. Oooh, they are so good!
 My recipe is almost identical to the one Juli posted over at Barefoot Gypsy blog if you'd like to check it out. Here's mine:
Aside from the double batch of mints I shared with you the other day, yesterday morning I was busy working on these....

white chocolate wafers made with crushed peppermint candy canes.
 and a few peppermint turtles for the little ones.
Plain milk chocolate wafers

and some peanut raisin clusters.
Can't forget the dark chocolate and coconut haystacks.
Can't forget the dark chocolate and coconut haystacks.
 And today I made chewy oatmeal cookies. Actually I used spelt flakes in place of the oatmeal and cranberries in place of raisins. Oooh, they are so good!
 My recipe is almost identical to the one Juli posted over at Barefoot Gypsy blog if you'd like to check it out. Here's mine:
Chewy Spelt (or Oatmeal) Cookies
Cream together:
1 cup softened butter
1 cup sugar
1 cup brown sugar (packed)
Mix in:
2 eggs
1 tsp. vanilla
In a separate bowl mix:
2 cups flour
1 tsp. baking soda
1 tsp. cinnamon
1 tsp. salt
Cream together:
1 cup softened butter
1 cup sugar
1 cup brown sugar (packed)
Mix in:
2 eggs
1 tsp. vanilla
In a separate bowl mix:
2 cups flour
1 tsp. baking soda
1 tsp. cinnamon
1 tsp. salt
Add the dry mixture a bit at a time to the wet mix.
When well blended add:
3 cups oats or spelt flakes
1 1/2 - 2 cups raisins or dried cranberries. (I use one 6 ounce package of dried cranberries.)
3 cups oats or spelt flakes
1 1/2 - 2 cups raisins or dried cranberries. (I use one 6 ounce package of dried cranberries.)
Drop by well rounded teaspoonful onto lightly greased cookie sheets. Bake for about 10 minutes at 375.
These cookies were just what I needed to satisfy my craving for soft oatmeal cookies, oh yeah.
These cookies were just what I needed to satisfy my craving for soft oatmeal cookies, oh yeah.
Tuesday, October 28, 2008
coasting along...sweetly
Today I awoke to fluffy snowflakes drifting across the wintry morning sky. When I let Timmy out for his morning break I couldn’t resist stepping out into them for just a minute. Of course I hurried back to the bedroom to tell my sleeping husband, “It’s snowing!” I’m real sure he appreciated that. Yes, it doesn’t take much to excite me, lol! I still feel that child like awe, that sense of magic when it comes to certain things, most especially things like first snowfalls, the first fireflies in summer or the first flowers in the spring. The feeling has never worn thin.

As much as I would like to be more ambitious or aggressive in my approach to finishing or beginning some projects, I am not in that particular place at the moment. Lately it’s like the season has settled into my soul. So I have been doing little in “accomplishing” and instead I have been tinkering. A little baking, a little crocheting and still keeping up with routine maintenance around the house. And for now that feels like enough.
Today I was going to run some errands including stopping by our nearby rural bulk food shop to pick up a few things. Instead I baked pies. (See what I mean? I’m just kind of coasting through the days right now) I figure with all the berries we were able to gather and freeze over the summer, I may be baking pies and cobblers all winter. Nothing wrong with that, though.
I’m a good pie baker. No brag, just fact. But then it really doesn’t take a lot to be good at it. You just need a dependable dough recipe and the right ingredients and tools.

Here's my basic recipes for pie crust and cooked berry filling. The dough recipe will make five 9 or 10 inch crusts. I usually make two double crust fruit pies and one shell for a cream pie or to freeze. The filling will fill two 9-10" pies.

Basic Pie Filling (berry or cherry) for two 10” pies
About 10 cups of fresh or frozen (and thawed) berries
1 ½ - 2 cups sugar depending on particular berries and their tartness. This time I used black raspberries, so I used 1 ½ cups sugar since they are naturally sweet. If I were making elderberry or sour cherry pies I would likely increase the sugar to 2 cups.
6 T. cornstarch
Up to a cup of water if needed. Sorry, I don’t measure, I just pour a little out of the tea kettle if necessary to make sure they are a little liquidy.
Mix sugar and corn starch in a bowl. In pan, place berries. If fresh, mash down somewhat to get them juicy. If from the freezer, do not drain.
Add sugar mixture and stir in well. Add a little water if necessary. Cook over medium high heat until bubbly, glossy and thickened, stirring continually to prevent sticking. Remove from heat to cool.
Dough for five 10” pie crusts
6 cups unbleached flour
2 cups Spectrum organic shortening or lard.
1 T. salt
about ¾ cup cold water
Mix salt and flour together.
 Add shortening and mix with pastry blender until it looks like this.

Add water by sprinkling it over the dough mixture with a spoon then working it in with your hands until you get this.

Once blended, form a nice sized ball of dough with your hands and pat it out somewhat on a piece of wax paper. Lay a second piece of wax paper on top and begin rolling it out.
 You must be firm with the rolling pin and turn the wax paper around fairly often to get an evenly rolled crust. I have always rolled my dough like this because it’s never failed to guarantee me a nice crust without integrating too much flour or having it stick to the rolling surface or having your rolling pin stick to the dough. It just works for me.
When adequately rolled, peel off the top layer of wax paper, flip the dough into the pie plate and then carefully peel off the other layer of wax paper that is now facing you.

You will do this again for your second pie.


Once you have filled your crusts with pie filling of your choice, then repeat dough rolling process for your top crusts. Just before applying top crust, wet edge of bottom crust. This seals the two crusts. Crimp edges by pinching dough between your thumb and index finger…at least that’s how I do it. Then with a knife edge, shave off excess dough. Vent your top crusts to allow steam to escape and bake as directed. I like to lightly sprinkle some sugar on the top crust. Just makes a prettier pie imo.
 I bake my fruit pies at about 425 for 12-15 minutes to brown, then another 30-35 minutes at 325.
Tah Dah! Who cares what's for dinner, let's eat pie!

Tuesday, August 5, 2008
Yum! Sweet Refrigerator Pickles
 This recipe came from an old and worn favorite recipe book I bought new when Coop and I first got together. You know the kind. One in which the pages have come loose from the binding and many are stained and worn from repetitive use. It’s been my best loved recipe source for the past twenty eight years.
 These pickles are easy to make and require few ingredients. They work wonderfully as a side dish and taste great on a burger as well. They are similar to a bread and butter style pickle. The following recipe will make about 3 pints of pickles. I normally double it and make 3 quarts or put them into a gallon size jar.
Sweet Refrigerator Pickles
7 cup unpeeled cucumbers or young zucchini or a mix of both sliced thin ( Actually usually I make them with young zucchini.)
1 large onion sliced thin
A green or red pepper chopped is optional
1/8 cup salt
Place veggies in large pan or bowl. (I use a dishpan when making a double batch.) Sprinkle salt over sliced veggies and cover with ice water. Let stand 2 hours. Drain.
After placing pickles in jars, make the following syrup and bringing it to a boil. Ladle or pour over the pickles.
1 cup vinegar
2 cup sugar
1 tsp. celery seed
Store in fridge. The recipe says they will keep indefinitely but they won’t really last that long! : )
I have also canned these pickles (shown in photo). The only difference in doing so is that I make the syrup up, bring to a boil and then add the drained pickles to the syrup and return to a boil before putting in jars. If you do can them follow basic canning instructions, (hot jars, hot lids, wipe rims well, etc) be sure to run a small spatula around the inside of jar before sealing to remove air bubbles. Hot water bath them for about 10-15 minutes.
Wednesday, June 25, 2008
done jammin’, now sharin’

I considered a few different recipes and as is somewhat customary for me came up with my own version for the banana jam. I liked the idea of adding a little rum to this jam, but the only thing I had in the house was a little Bacardi 151 and a little Malibu Rum. Needless to say I thought the 151 might be a little too much, so I opted for the tropical flavor and lower alcohol content of the
Cabana Banana Jam
8-9 ripe, but still firm bananas
½ cup lemon juice
4 ½ cups sugar (I used raw turbinado sugar)
¼ c.
¼ cup water if necessary
Pour lemon juice into large pan. Slice bananas into pan, then mash up well with fork or pastry blender. Heat, adding 4 ½ cups sugar. If needed, add ¼ cup water to help liquefy. Cook over medium heat, bubbling until thick and gloppy, (you know, jam consistency), stirring occasionally as needed. (I should have timed this, but didn’t so my apologies. I’m thinking it cooked 40 - 60 minutes, possibly a bit longer)
When thick enough to call jam, you can remove from heat and can or do as I did and add ¼ cup
***
As I was making jam I realized I hadn’t done so in a number of years. Actually I think the last time was when we lived here prior and we had our own strawberry patch. And I realized that most jam recipes call for added fruit pectin which I have never used until this week. I only used it in my strawberry banana jam. The only difference is when using the pectin your jam sets up quicker. The longer you cook the jam I noticed the darker it becomes. My old fashioned strawberry jam turned out much darker because I cooked it a long, long time as opposed to adding pectin. You can see the jars on the right are way darker. The strawberry-banana jam is in center of photo and the banana jam on the left.
Friday, November 16, 2007
a simple and seasonal recipe
Now this is very seasonal, simple and sounds very yummy.  I just happen to have a good supply of butternut squash from the garden so think I may be trying this soon.

Butternut Squash Apple Cranberry Bake
Thursday, August 9, 2007
Zucchini Fritters
I have a plethora of zucchini in case I hadn't mentioned that.  :)  I found a tasty recipe for Zucchini Fritters and tried it today.  Pretty darn good I must say.  I served them up with a side of sour cream and freshly made salsa.  What a treat!

I decided to turn the basket of assorted tomatoes that were setting on my table into salsa this morning.  It tastes soooo good being fresh from the garden, especially with the freshly cut cilantro.  Nothing beats salsa made fresh!
I promise to share the recipe in a near future post.
I was glad I made it to the garden early this morning because we got hit with another thunderstorm and downpour later.  Last night we had torrential rain and wind, not to mention the lightening that was striking from all four directions.  Wicked to say the least.  My garden has had quite enough rain so I hope it settles down soon.  It would be nice if it would cool down, too.  But I refuse to complain about the weather.  It is after all August and we are at least not getting the floods and 100 degree temps here in NE Ohio.  That's not to say it hasn't been extremely hot and sticky here however.  According to the forcast there's little relief in sight.  But the good news is...

Saturday evening is supposed to be clear.  Why is that good news?  Because I plan on spending the night out under the stars watching the Perseid meteor showers.  I always make this effort because, as I like to say (with a grin), it is  so nice for the universe to put on such a display for my birthday every year.  :)  Better yet, this year we should have complete darkness with the new moon and...we had a switch installed on our security light so we can turn it off!!!  That was my birthday gift to me.  I was afraid it might not get installed in time so when I sent payment I wrote a little note explaining why I hoped the co-op could get to it, but understanding if they couldn't and saying thanks for the great service just the same.  On Tuesday a big ol' Fireland's electric truck pulled up.  As I greeted the fellow I explained how delighted I was to see him and why. He said he read my note and that he understood completely and that was "why I'm here today."  That made my day!  So, now I can star gaze any time I like without the glare from the security light.  That makes me very happy.
Tuesday, August 7, 2007
pepper relish
Our tomatoes are finally beginning to ripen. The San Marzano plum tomatoes have been hit with blossom end rot. Just as begin to ripen the bottom end becomes brown and eventually turns black and rotten. From what I’ve read the only treatment for that is calcium chloride. The problem results from a lack of calcium in the soil or the plants not being able to assimilate what is there. I will have to look into this further. I don’t want to lose my plum tomatoes!
The peppers are prolific as mentioned. Here’s a photo of our pepper patch…just the Hungarian peppers that is.

I was finally able to find a good price on onions by the 10 lb. bag and so I was able to make a large amount of hot pepper relish. In fact I ended up with 20 pints! Even though the only veggies in this relish are hot peppers and onions, it’s not really “hot”, but rather tangy and sweet with just a hint of heat. We love it on burgers or other grilled meats. I think it would work nicely if one were to use it as a replacement for sweet relish in potato salad, too.

The recipe is simple…
50 Hungarian hot banana peppers
about 6 lb. onions
Remove tops and cut peppers in half, remove seeds. Skin the onions and cut into wedges. Chop veggies up and place in large glass, stainless steel or enamel pan. Using a meat grinder or food processor makes the job easier and quicker. Cover fresh veggies with boiling water and let set for 5 minutes. You can repeat this process two more times to reduce hotness of peppers, but I’ve never had to. Drain veggies and place in a cook pan, again either stainless steel or enamel.
Add:
8 cups sugar
3 pints cider vinegar
6 T. salt
Bring to a boil and cook 20 minutes then pour into hot sterile pint jars. Wipe rims and seal tightly. Process in boiling water bath for 15-20 minutes. Makes about 10 pints.
If you try it, hope you enjoy as much as we do!
Well, we got to
I am very grateful for the opportunity to have seen this show and despite it being three hours long, it was never in the least bit boring. I would highly recommend it. However, I wouldn’t advise taking small children/babies to this as the gunfire and cannon fire is very loud, plus three hours is a long time for little ones even with a twenty minute intermission. A 4-6 year old would probably be entertained, but any younger I’d recommend getting a sitter for. Just my two cents.
Monday, July 9, 2007
Well, I’m much happier now about hanging the clothes outside on the line since Coop fashioned two clothesline props for me. He made one from a pole style curtain rod that we had around and the other from a metal rod he found in a pile of “junk” left by the previous tenant. At the upper end of both he drilled and screwed to the pole a metal brace he had bent.
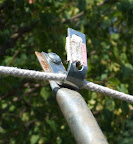
This serves as a clothesline catch and lends additional support. I was in dire need of these to keep the clothes from dragging the ground when hung. I recall my mom using wooden props with a grooved center at the top and had suggested this to Coop as a possibly less expensive alternative than the purchased aluminum props. But he went one better and made them by recycling what was on hand. I am proud of his ingenuity and so glad to be married to a man like that! And I’m sure am glad to have a clothesline and props again! There’s nothing like the scent of sheets and towels that have been hung out in the fresh air to dry.
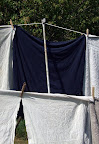
Between installing compact fluorescents, washing primarily in cold water and hanging the clothes to dry, our electric bill has been dramatically reduced. We notice a little more savings each month as we continue to cut our usage. We unplug the microwave at night, turn off the power strip to the TV and DVD player along with shutting the PC completely down each night. It sure makes a difference when these energy vampires are not plugged in.
Coop has been busy making a new gate for the duck pen.
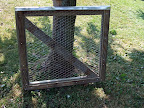
That required a trip to town this morning before the heat became too stifling, to purchase a roll of chicken wire. That’s the only thing purchased for the project. Everything else used was scrap wood and metal pieces we already had or came across. We stopped at Home Depot, also to check on the price of pressed wood and plywood. Pressed wood is about ¼ the cost of plywood, so that will be the way we go. We hope to build a more substantial house for the ducks soon.
Since our tomatoes aren’t ripe yet, we swung by the grocery store to pick up one or two for a supper salad. When the weather gets as hot as it is we like a light supper and lord knows, I still have plenty of romaine in the garden! I came across a few bonus buys while there and so brought home a bag of organic potatoes for only $1.50 and a big bunch of organic bananas, somewhat ripe for only .39 a pound…with the promise of making some homemade banana pudding. The potatoes are growing eyes but that doesn’t hurt them a bit and I’m sure I’ll use them up quickly enough making home fries, potato salad, etc. Oh yes, and I purchased six locally grown and very fresh and firm green peppers, enough to make a large crock-pot full of stuffed peppers, yum! I’m sure I’ll be inviting someone over to share those!
***
Yesterday I spent about four hours sorting through boxes and organizing the upstairs closet and storage room. Despite my efforts to simplify over the past few years, I still have way more stuff than one ought to. I have gotten rid of many things, but it seems each time I do a housecleaning, it gets easier to let go of a little (or a lot!) more. It’s funny that you can forget you have things until you go rummaging. When you stop and realize you had forgotten about this or that and have managed quite nicely without it, it becomes much easier to kiss it goodbye. J By the end of my work yesterday I had ended up with four large boxes of goods to place in a yard sale my sister and I have tentatively planned for late summer, plus a few additional things to offer on eBay.
Today my daughter called to let me know her mommy duck had five babies following her around the yard now. I guess she had better luck than we did with our mama. But then coons probably aren’t as thick around her place due to the openness of the surrounding area. Here we are surrounded by high grasses to the south and woods to the east, west and north (right behind the house).
That’s all my rambling for now but here’s my own recipe for homemade microwave pudding/pie filling. Enjoy!
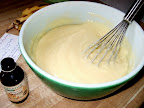
Microwave Pudding & Pie Filling
You will need a large glass bowl that fits into your microwave, a whisk, measuring cups (1/3 c. and 1 c.) and a tablespoon.
In bowl place 4 eggs and beat them. To the eggs add 1 cup sugar and 1/3 cup cornstarch. Mix together well. Add 3 cups milk and mix well again. Microwave on high for approximately 8-10 minutes, checking and stirring at 2 minute intervals. When thick and bubbly, remove and stir well to smooth. Add 1 tablespoon vanilla. Cool before serving.
To make banana pudding I replace the vanilla with natural banana flavored oil by Frontier brand, but this isn’t necessary. When pudding is cool line a dish with sliced ripe bananas (and vanilla wafers if desired). Spoon pudding over the bananas and chill. Top with whipped cream if desired when serving.
This makes enough pudding to fill a pie shell, also.
Saturday, July 7, 2007
Bugs, Beets & Heat
Seems the heat wave the western part of the


The zinnias are looking brilliant and attracting all manner of butterfly and bee as well as those damaging Japanese Beetles, yuck. We’re spraying the flowers daily with a mixture of water and Dr. Bronner’s organic lavender and hemp oil soap. Seems to work well but you must be diligent in keeping up with those pests! I fill a quart spray bottle with water and squeeze a good helping of the liquid soap in and shake it up, that’s all. My niece sent me the following info on Milky Spore so maybe we’ll try that for next year.
Milky Spore is a naturally occurring microscopic bacteria (Bacillus popilliae) that kills Japanese beetle grubs before they can grow into ravenous adults. It's a long-term solution because it survives winter temperatures. The Milky Spore population increases each year, reaching peak
effectiveness about three years after application, and lasts ten years or more. You can learn more about it and order it here. Thanks Jenni!
This morning before the day grew hot I pulled most of the remaining beets. I now have a few containers of beets and beet greens in the freezer as well as a jar of pickled beets in the fridge. We enjoyed a nice helping of the sweet baby beets last week, simply cooked and chilled. I’m a beet lover! I’ve decided that next year rather than planting chard I’ll plant lots of beets. Not only do I get the beets, but the greens are as good as chard. I never thought about that before. By the way, here’s my favorite recipe for pickled beets and eggs…
You’ll need a gallon jar or large container for this recipe, but you can halve the recipe and use a smaller container. At times I’ve resorted to using a Tupperware bowl or plastic ice cream bucket. Just make sure you let the liquid cool enough before pouring into a plastic container.
Pickled Beets & Eggs
15-20 small beets (or two cans from the store)
1 c. water
2 c. sugar
3 c. vinegar
1 t. salt
1-2 t. allspice or pickling spice
½ t. whole cloves
about 15 hard boiled eggs, peeled
Place beets and eggs in jar. Combine remaining ingredients in heavy pan and heat until boiling. Stir to dissolve sugar well and watch to avoid burning or scorching the sugar. Pour hot syrup over eggs and beets. Cool for awhile, then seal and place in fridge to pickle. Eggs are best if left to pickle several days before eating.
***
I couldn’t help but share the following photo of Coop and his winged friend. It just kept landing on him so I finally couldn’t resist snapping a photo while it sat on his head. He was urging me to hurry up as it was tickling quite a bit.

Wednesday, June 6, 2007
Busyness & Butterflies
What a busy day it's been, not to mention week! The garden is completely planted now, thank goodness! Blossoms are coming on to the tomatoes, the swiss chard is growing tall and the eggplant is coming up. Lots going on out there and the plants are doing well with the recent rains.
I've been busy around the house, catching up and trying to keep decent meals on the table while tending to things outdoors and helping friends accomplish their necessary tasks. I even managed to upload some eBay listings in the past day or three to create a little extra cash flow. If interested, check the items out using the link on the right hand side of my blog.
We've really been enjoying our fresh garden greens. Last night I made a large bowl of wilted greens as an accompaniment to dinner. They were delicious. I used a combination of spinach and romaine lettuce. I'm including the easy recipe below in case you've never tickled your taste buds with this nice change of pace from a regular salad.
I've been busy around the house, catching up and trying to keep decent meals on the table while tending to things outdoors and helping friends accomplish their necessary tasks. I even managed to upload some eBay listings in the past day or three to create a little extra cash flow. If interested, check the items out using the link on the right hand side of my blog.
We've really been enjoying our fresh garden greens. Last night I made a large bowl of wilted greens as an accompaniment to dinner. They were delicious. I used a combination of spinach and romaine lettuce. I'm including the easy recipe below in case you've never tickled your taste buds with this nice change of pace from a regular salad.
Wilted Lettuce Salad
Large bunch of cleaned leaf lettuce or young spinach or a combination
6 slices bacon
2 tsp. sugar
1/4 c. cider vinegar
2 tbsp. water
2-4 hard cooked eggs, quartered or chopped (optional)
2 green onions, sliced (optional)
Tear lettuce into large bowl.
***
Monarch Butterflies
Somehow, as I was browsing the internet this morning I got fixated on Monarch Butterflies. It didn’t take long to learn that the loss of farmland and use of herbicides is a major threat to the lives and future of these beautiful creatures. It relieves me to know that these 80 acres surrounding me are no longer farmed and that the milkweed grows freely.
Here are two organizations I came across that offer ways to help attract and preserve the Monarch and keep our skies and yards filled with nature’s beauty.
http://www.monarchwatch.org/waystations/ explains how we can offset habitat loss by creating a Monarch waystation for the butterflies on their yearly migration route. Certified Monarch Waystations then become part of the International Monarch and Waystation Registry and can display the Waystation sign. However, submission for certification is voluntary.
http://www.livemonarch.com has as their goal to keep the skies filled with color by educating everyone about habitat loss and what each of us can do. They promote habitat reclamation projects across
Monday, May 28, 2007
ducks are sitting, peonies are blooming & a recipe: sloppy joes for a crowd

suggestion: if all you see are little blank boxes instead of photos on the website, right click on your mouse and then click on show all original images. I've been experiencing trouble with uploading photos to blogger so have had to bypass their method and insert html into the posts.
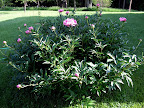
The lavender and white sprinkles of wild phlox contrast beautifully against the greens of brush and trees and lend a splash of color to the field across the road. Have I mentioned how wonderful it is to wake to birds singing various tunes? And then this morning, to rise and find the peonies have bloomed!
Summer seems to have arrived although the calendar tells us that it’s several weeks away. The nights have been warm enough to sleep with window open. The woods out back are a mass of green, making the sight of a deer within near impossible now. So, we watch as they cross near the barn to the adjacent field.
This month has been a busy one and June looks no different for the most part. This last week of May will be spent helping Conrad and Janet prepare for their yard sale, then organizing things in the barn here for their auction on June 30th. Janet and I will be setting up the kitchen for auction day and serving the traditional auction fare for those who come to browse and buy. It should be fun…I keep telling myself that lol! I’m sure it will be. I’ve managed the kitchen on several occasions for other auctions so it’s just a matter of organization and preparedness. Once you are ready to go the rest is relatively easy. (It should be fun, it should be fun, it should be fun…it will be fun, it will be fun, it will be fun…)
In the meantime…
Coop has been gathering some eggs recently from Louise, our fickle little black hen
Most people I’ve heard of don’t care for duck eggs, but then they’re referring I believe to regular duck eggs rather than
In light of summer gatherings, whether auctions or reunions, here’s the recipe for a mega batch of sloppy joes. This recipe will make a large electric roaster full or two large crock pots full. As always with my own recipes I more or less estimate amounts, so
Recipe for electric roaster or 2 large crock pots of Sloppy Joes
15 lb. lean ground beef
Approximately 3 large onions diced
Cook beef and onions together in large pan or soup kettle, then drain as well as possible.
Add:
1 #10 can ketchup (institutional size)
1 cup brown sugar
Chili powder to taste (I’d suggest about 3-4 T.)
salt and/or garlic powder if desired, to taste
Place contents in your crock pots or roaster and simmer til time to eat.
I think the last time I used this recipe I actually only needed about 2/3 of the can of ketchup. Just store the rest in a jar.
Wednesday, May 16, 2007
Strawberry Shortcake- easy but genuine

It’s a dreary, rainy day here in
Shortcake
1 ½ c. flour
2 t. baking powder
¼ t. salt
4 T. fat (shortening, butter or vegetable oil)
½ c. milk
½ c. sugar (optional)
This makes more of a dough than batter, so it will become stiff. When mixed well, place in lightly greased pan and spread as evenly as possible. You may need to use your hands. Bake for 12-15 minutes at 450◦. You’ll want it to be golden brown around edges. Enjoy!
Subscribe to:
Posts (Atom)
